Penthouse Chat
This is a guide on how to access, install and use the loumand penthouse chat app. There’s no need to read the whole thing if you’re not encountering any issues or questions, but please at least read the Terms, Conditions and Privacy and ensure you are in agreement before joining.
Table of Contents
- Terms, Conditions and Privacy
- How to Join
- First things to do when you show up
- How to install the app: general information
- Differences between IRC and Discord
- How to format text
- How to control your channel
- Nerd Locker Stuff
Terms, Conditions and Privacy
General Terms
This service is invitation-only and not intended or available for use by the general public. I am not a lawyer or a professional systems administrator, and do not accept payment or donations for it.
Your data
The data collected by this service is, to the best of my knowledge and ability, the minimum required to operate the software. As the server owner and administrator, I have access to the records on the server of the data that you use to interact with it. This includes the IP address that your computer is using to request access (i.e., if you use a VPN, the VPN’s IP address will of course be the one recorded), your account information including your password, and all of the messages that you send through the service, including those sent in private channels. I will never share this information with anyone or use it for any reason except the maintenance of the software.
Your obligations
You agree not to use this server to host any content illegal in the state of New York, and consent to your data being processed and stored there.
How to join
To join, you need a username and default password. These can only be acquired from tei. Once you have yours, go to https://penthouse.loumand.com/
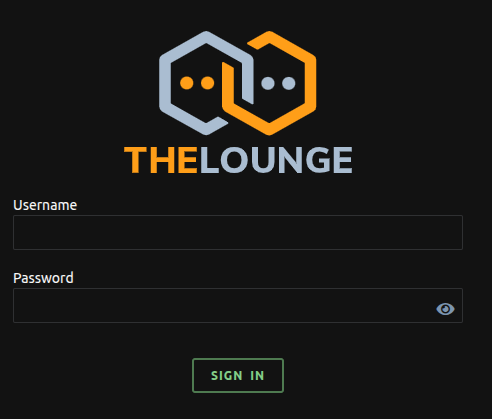
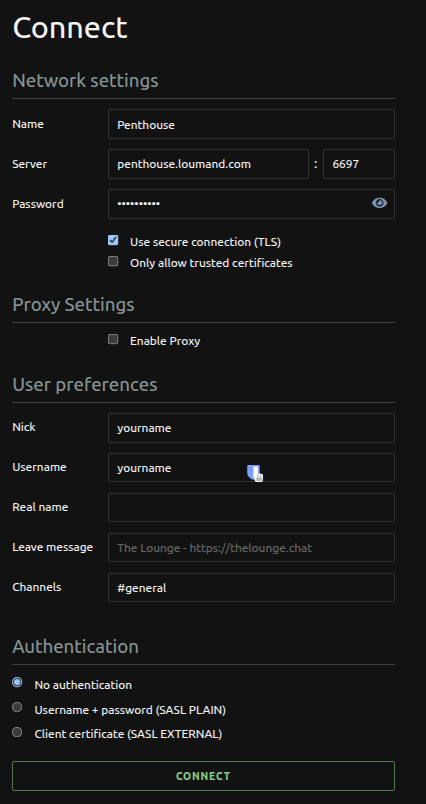
You will see two login screens in a row. Think of the first as a bouncer checking that you’re allowed to go to parties, and the second as a butler pointing you to the correct party and asking what you’d like to be called once you’re there.
Here’s the first, where you’ll enter the username and password you’ve been given:
And here’s the second. Leave everything in Network Settings, Proxy Settings and Authentication. Just change where it says “yourname,” to whatever name you want to go by. It doesn’t have to be the same as your username! (The nick and username here also don’t need to be the same, though the username doesn’t actually show anywhere. The nick is the one that actually matters, which will set as your display name and that people can use to ping you.) These can’t have any spaces, so you have to be “GuyWhoSuggestsCastration”, not “Guy, who suggests castration.” That said, people usually go with shorter nicks on IRC, because typing a nick is how you ping someone. However, if you want a long nick but have a name that everyone calls you by, you can always add your name to the “custom highlights” section that we’ll see later to be pinged for it too.
You’re in! You’ll be auto-joined to the #general where you can say hello to people. There are many more channels in active use! To find more, send the message “/list” in general or in the special channel called the lobby, which is the place you go when you click on the word Penthouse at the top left. It will give you a list of all the channels in the server and ther descriptions. Click on the familiar ones to join them.
First things to do when you show up
- Click on the gear in the lower left-hand corner, go to Account, and change your password. CHANGE YOUR PASSWORD! PLEASE CHANGE YOUR PASSWORD AND DO NOT LEAVE IT AS THE DEFAULT PASSWORD!!!!
- While you’re in settings, you will probably want to go to Appearance and choose “Hide All Status Messages” from the Status Messages section. (This hides messages about peoples internet connections coming in and out, which are annoying and not really relevent in the days of smartphones.)
- You can also choose your theme!
- Although you can choose your theme and make things look however you like using the “custom stylesheet” box in settings > appearance, some people like their usernames to appear a specific colour for others, so if you’d like to put in those preferences, paste the CSS on this page into the custom stylesheet. The first section is to change the colour on all of your own message text, and te rest is for other peoples’ usernames. If you want your name to be on this stylesheet, message tei with a preferred hex code!
- By default, whenver someone types your nickname, that message will be highlighted and you’ll get a ping notification. If you want words besides your nick to do that– for instance, to add a short form of your name, or be notified whenever someone mentions castration–
- You can install the app on your device! On mobile, this will depend on your OS; on desktop, it will depend on your browser.
How to install the app
The software that allows you to access this chat is a progressive web app, which means it can be installed on any platform to run exactly like any other app would, using the resources of the browser in the background. You’ll do this installation from the browser, and won’t have to use the browser to interat with it at all after that.
In general, you’ll click a “add to home screen” button from mobile. The behaviour of a PWA is different from what that button does with a regular web site. For specific instructions, choose your platform below:
Mobile
Android
iOS
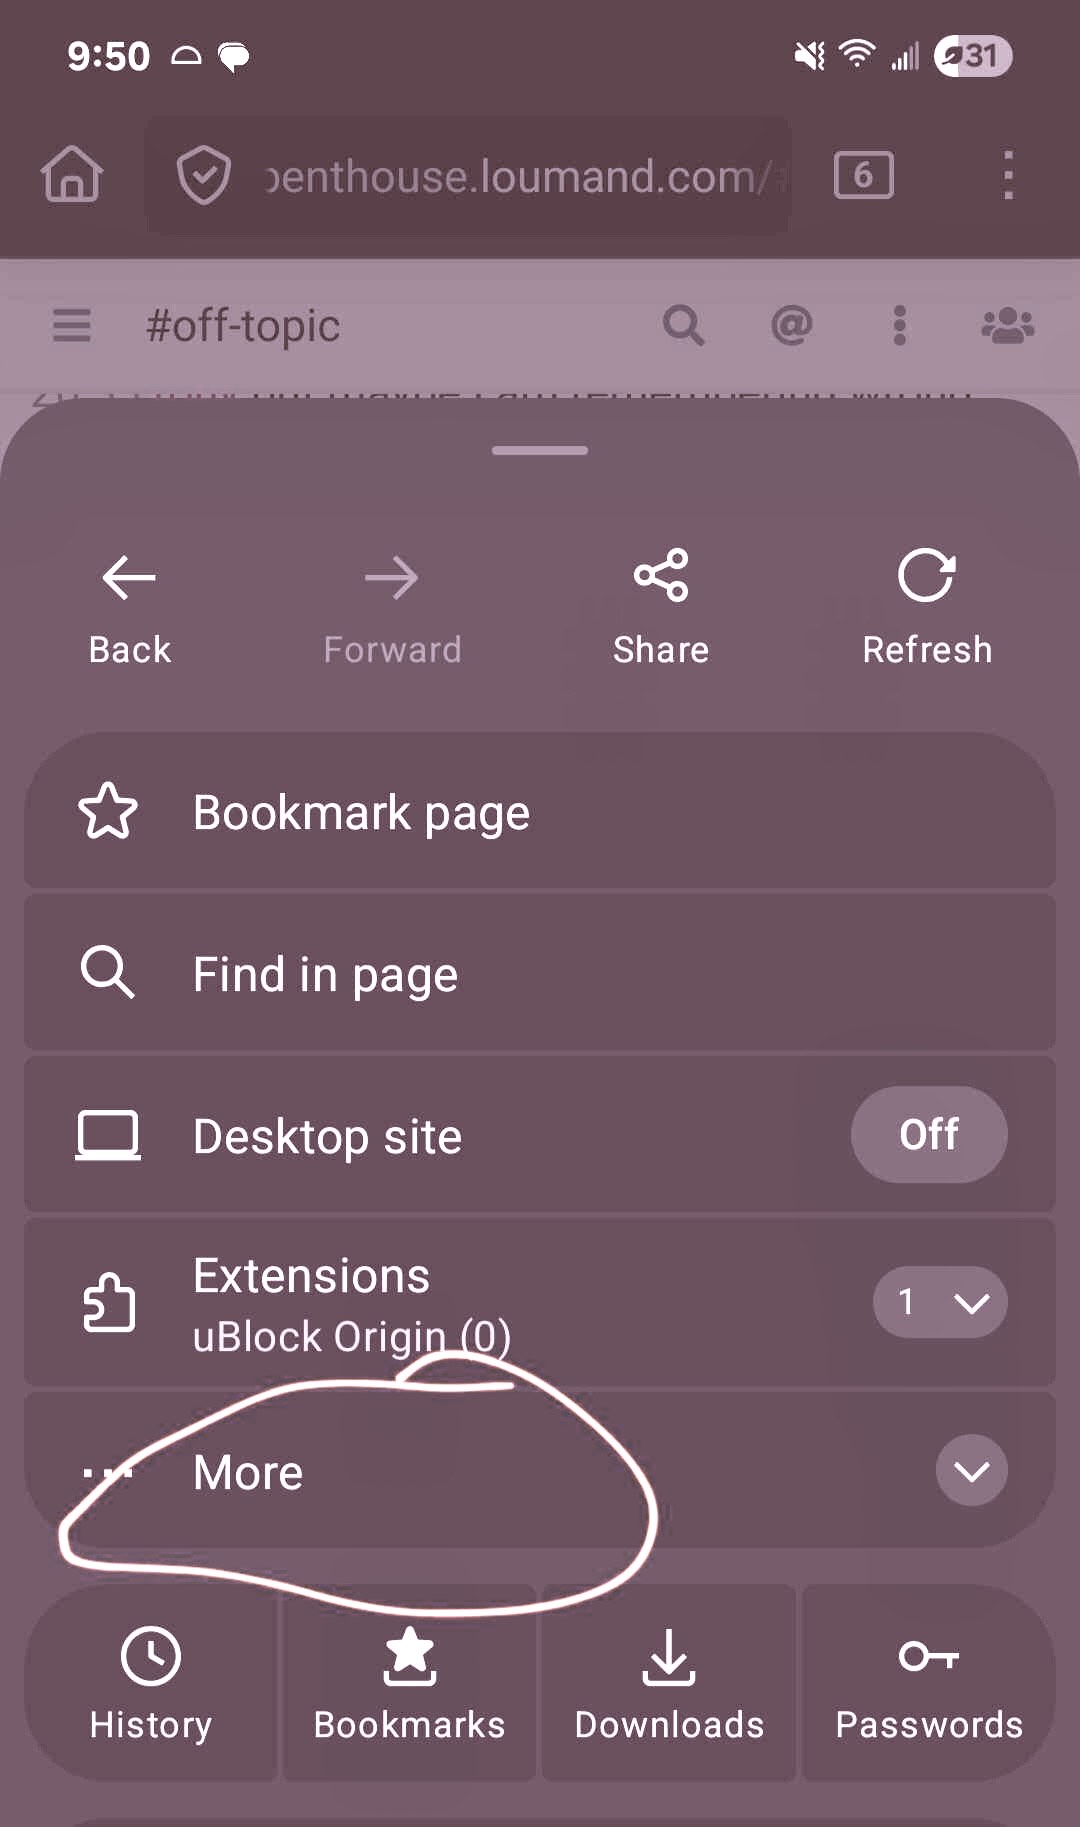
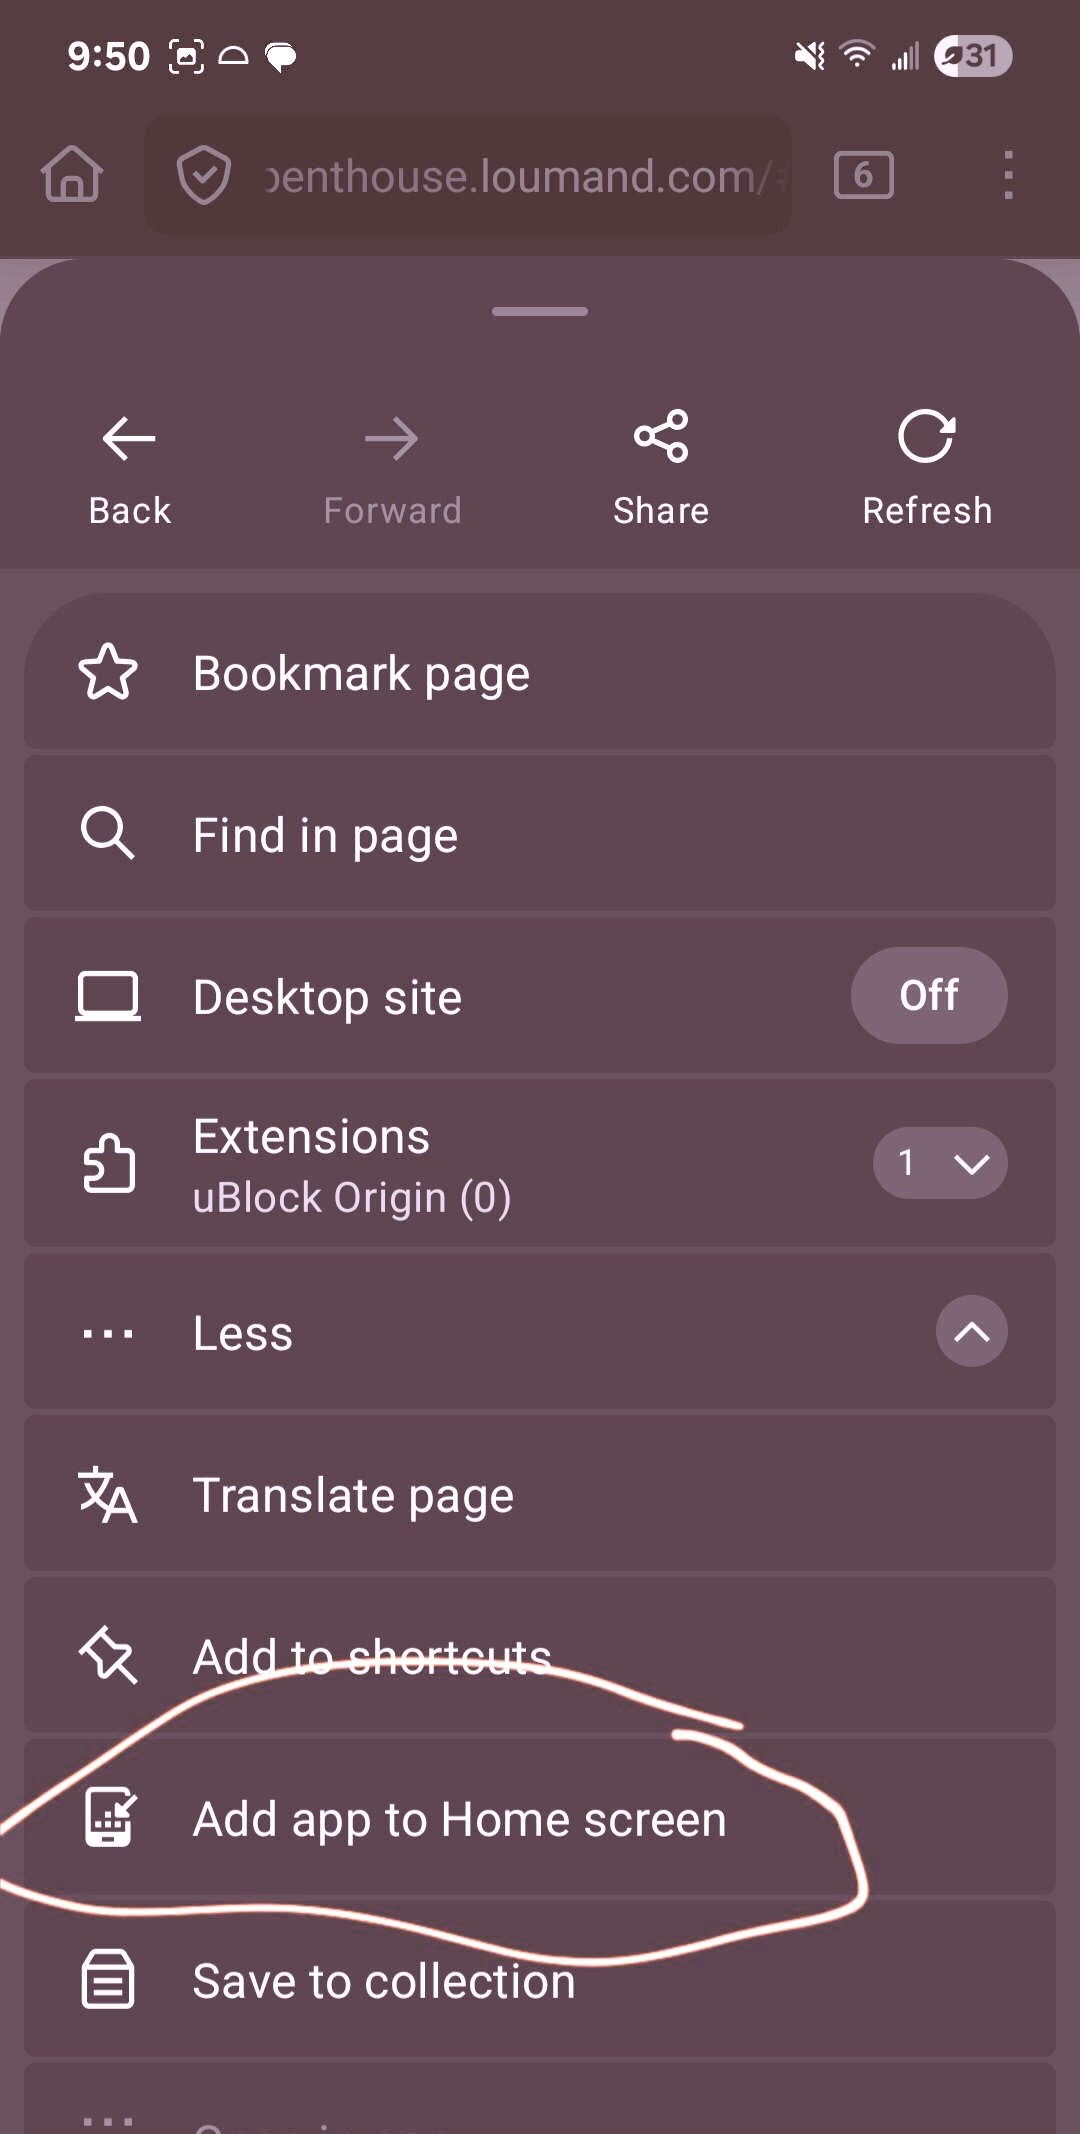
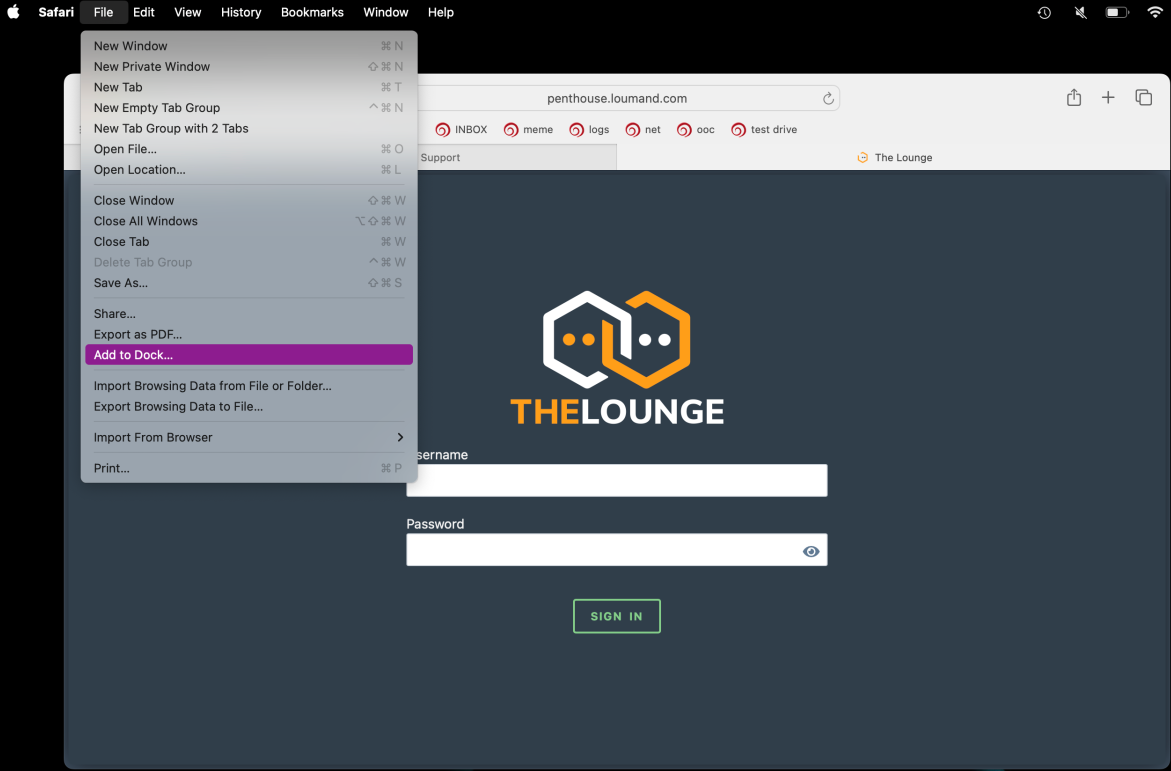
To install the app, you need to be using the Safari browser. If you don’t use Safari for other browsing that’s fine, you won’t need to touch it again, you just need to do these steps on it.
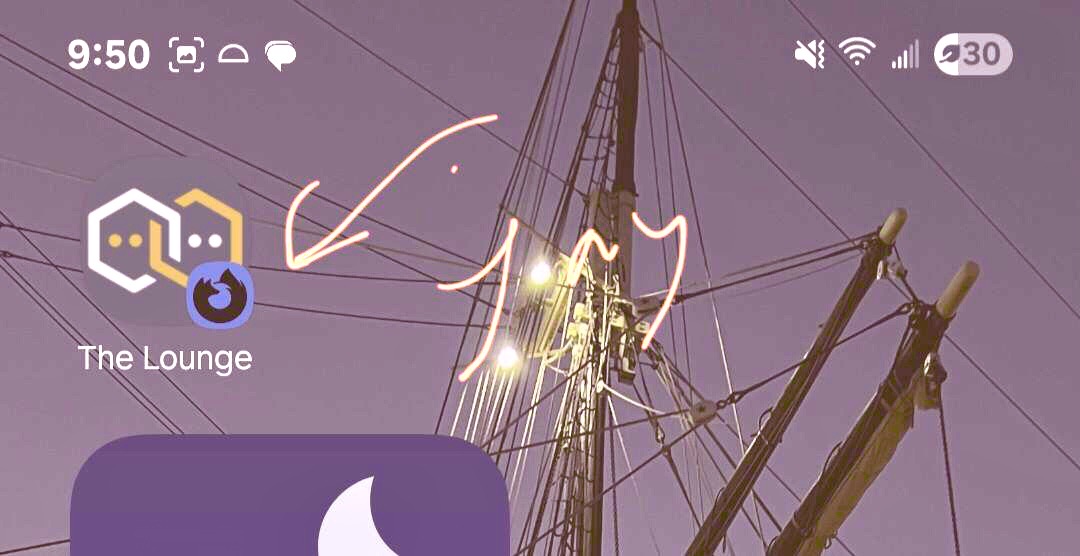
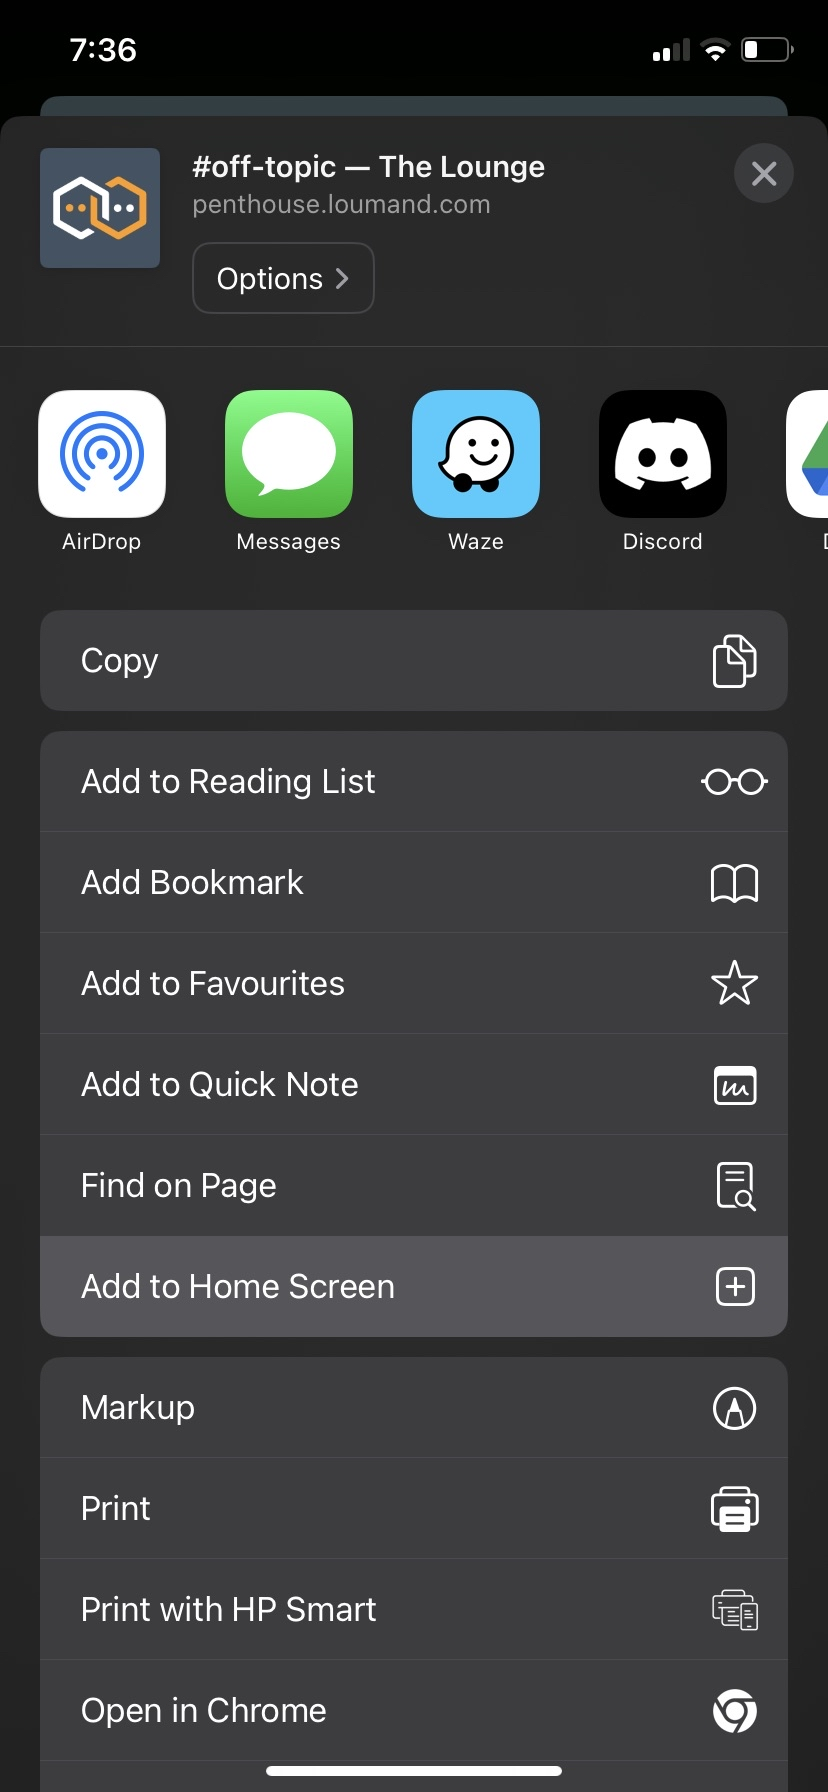
Go to the website, then click this guy:

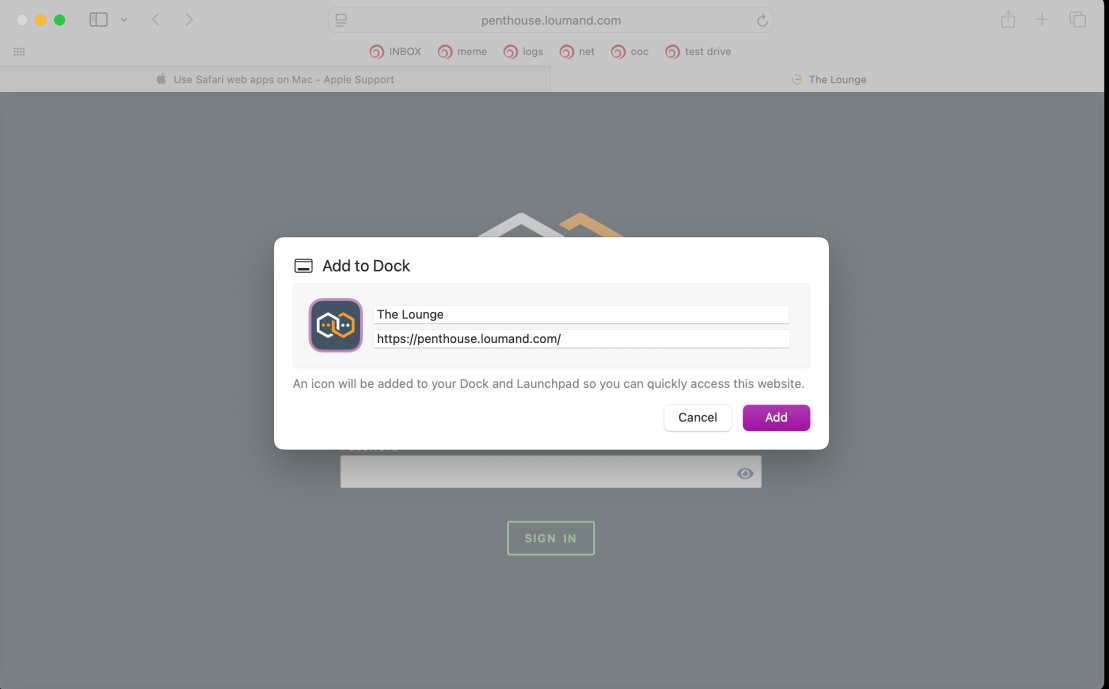
Choose “Add to Home Screen”:
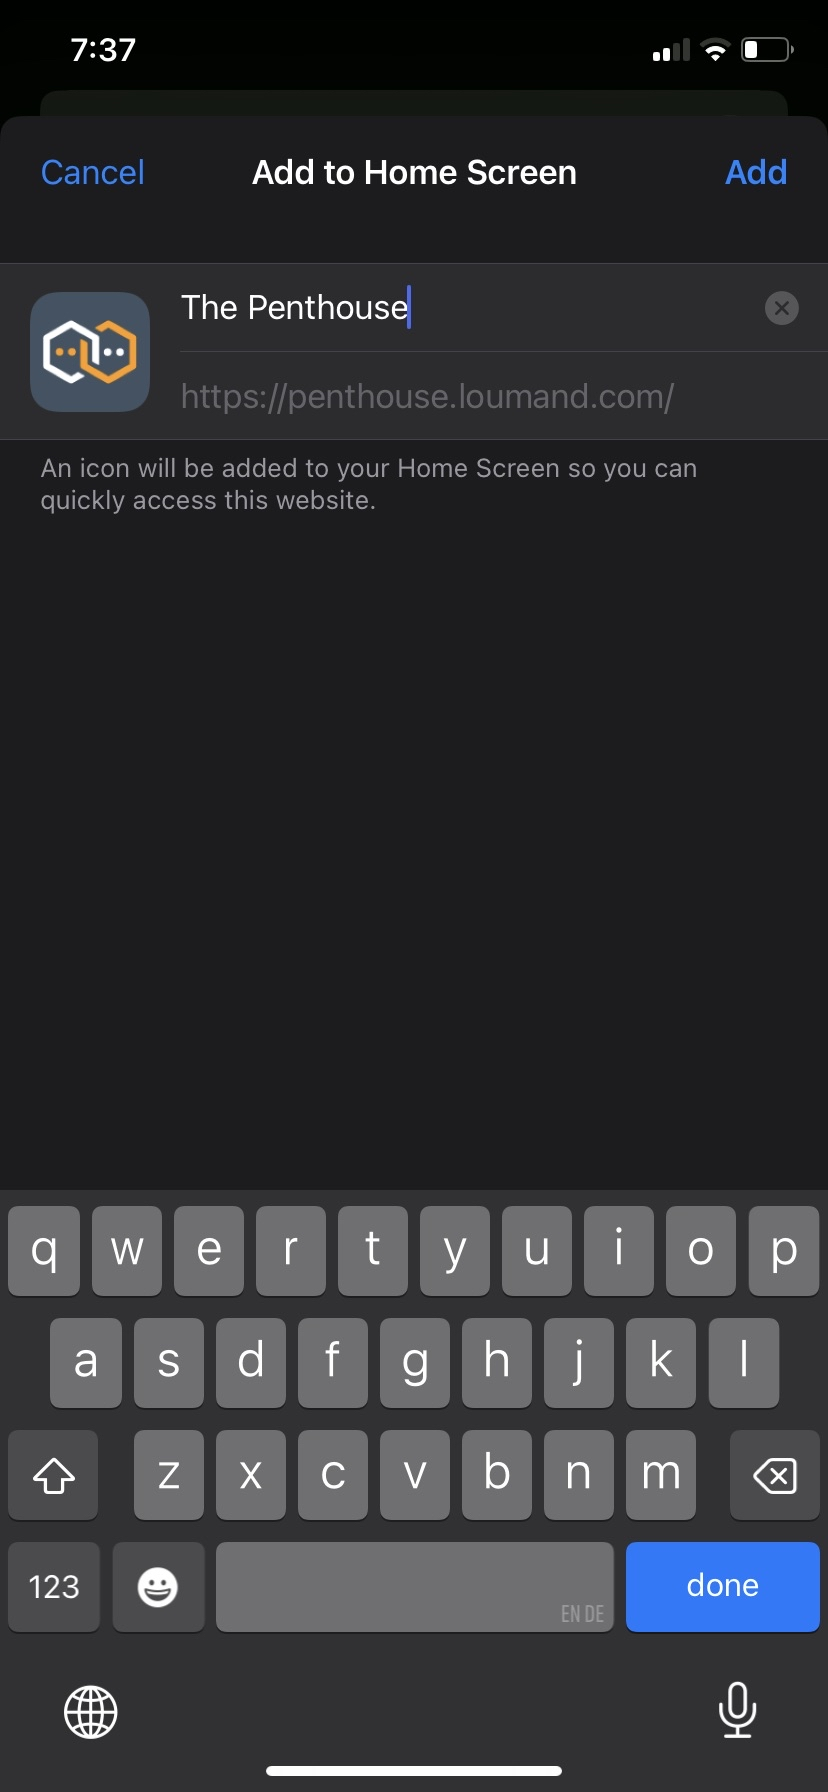
You can give it whatever name you like:
Click on the icon that was just added to your home screen. You’ll likely have to log in again. (With the username and password from the first screen: that’s the username you got from tei, and the password you just changed to replace the default.)
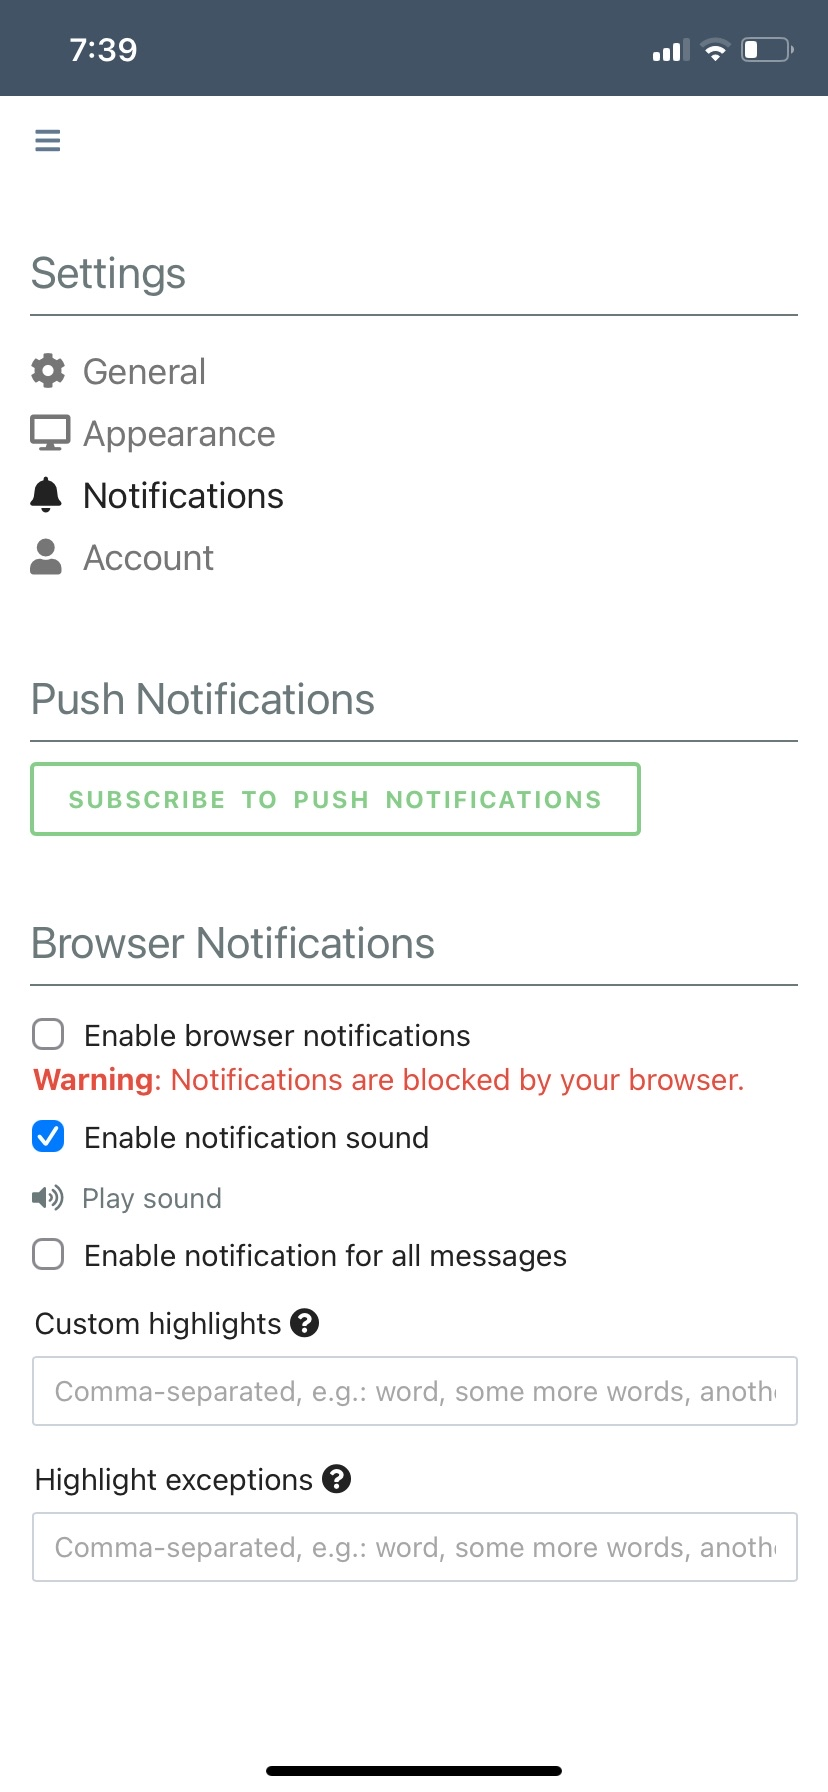
If you would like push notifications on your device, go back to the gear in the bottom left, and go to Notifications. Click the green button:
And allow the popup:
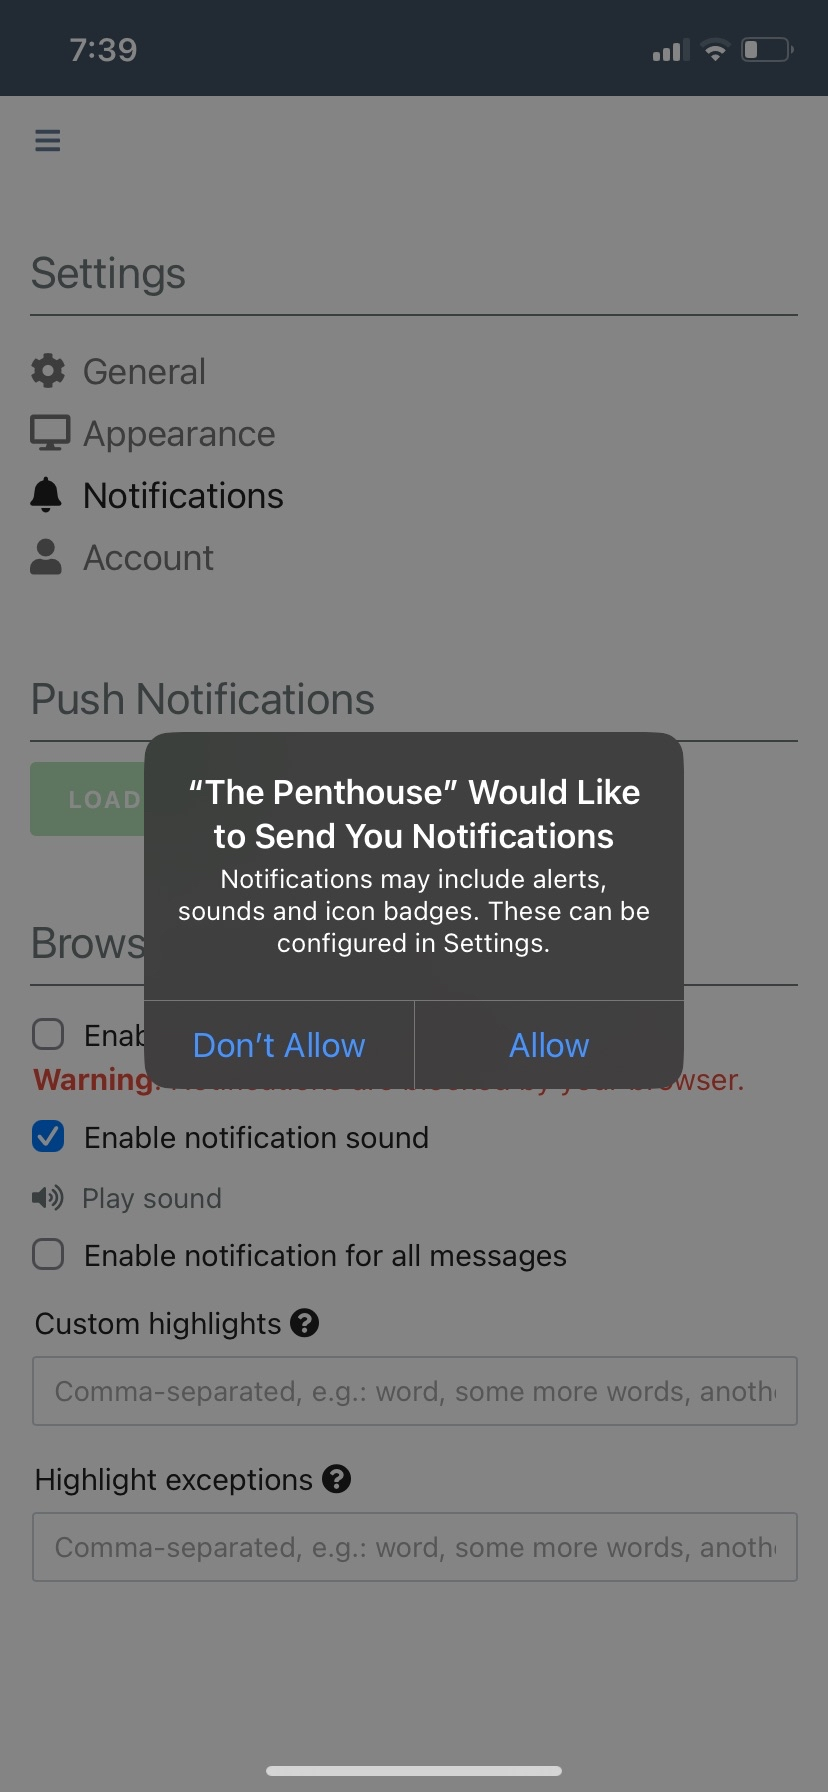
You’ll get a notification whenever anyone says your name.
Desktop
Chrome
Click the Install App button in the address bar or choose Install [app name] from the three-dot overflow menu at the top right. Untested, if you install please send screenshots!
Firefox
Instructions for Firefox Untested, if you install please send screenshots!
Desktop Safari
Instructions from apple support here.

Differences between IRC and Discord
IRC is the protocol that a lot of Discord’s language and conventions come from– the fact that spaces on Discord are called “servers,” (even though they’re not really servers), the fact that channels start with a # and commands with a /, are all IRC things Discord used in order to feel familiar to people coming there from IRC. Going the other way around, here are some things you might want to know are different:
-
Gee Penthouse, how come your Maître lets you have infinite channels? Channels in IRC are created whenever someone tries to go to them. You can join a channel by typing /join #channel, and if the channel doesn’t exist already, it will be created once you go to it. For non-registered channels, it will also disappear if everyone in it leaves. In our setup, if you just type in #mychannel in the chat, that link will be clickable, but the channel won’t actually be created unless someone clicks on it to join. So you’re welcome to make your own channels to use as breakout rooms, same as threads in discord. You can also make your channel password-only, and directly invite people to it, creating a private group. To give a sense of core functionality to the app, though, I have set the “usual” penthouse channels to auto-join, so you should see basically the same familiar setup of permanent channels in the sidebar by default.
-
Images will self-destruct. This isn’t really a software-specific limitation, just a consequence of using a hobbyist-owned service instead of one owned by a company selling your data for money. Text is small and cheap, but I can’t commit to storing the volume of images that get posted in this place for all time. Therefore, images you upload are automatically deleted after two days.
-
Editing and deleting messages: Not currently available. If you make a funny typo, congrats! If you say something you regret, apologize and move on.
-
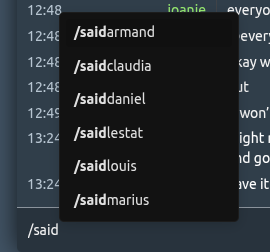
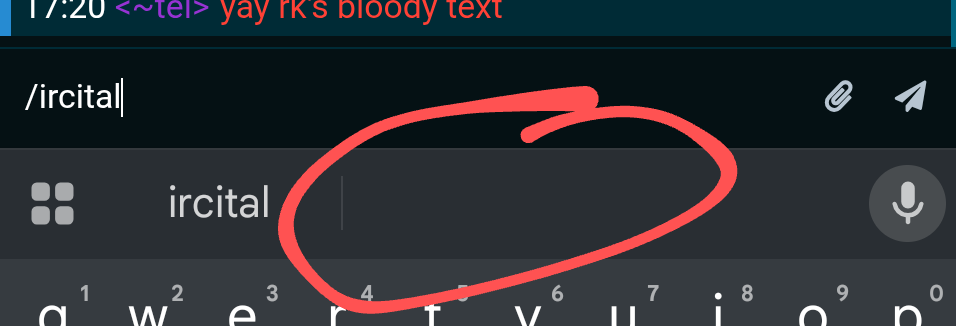
Our emoji are (for now) stickers! Although anything uploaded via the paperclip icon uploader in the app gets stored in a folder that will clear out after two days, obviously there are images used more frequently than others that we would like to have easy access to. Therefore, our custom emoji have been uploaded to a permanent location, and are accessible with a /, instead of the : discord uses. The plan is to also make them available as regular emoji, but there isn’t, unfortunately, any way to directly react to messages with them. You just gotta act fast when someone mentions feet.Type in /emojiname, and you’ll get a popup list showing you which are available, like so:
-
Replies and pings: Any message containing someone’s nickname (the name actually showing beside their messages, which you can change at any time) will highlight for them/notify them if they have notifications turned on. So only say nice things when you’re gossiping. There is no one-click method to reply directly to a specific message in IRC; instead, you should just start your reply with the nick of the person you want to reply to in a busy conversation. If you need to specify which specific message, copy/paste a bit of it inside of > < or something. A kind person has actually written me a piece of javascript to automate this process, I just haven’t figured out how to actually… put it in the thing yet.
How to format text
Desktop
Hit ctrl-k for a colour menu, ctrl-b for bold, ctrl-i for italic.
Mobile
Ok buckle the fuck up. Let’s do colour first.
Copy the contents of this text box. Yes, I know it doesn’t look like anything. Hold my hand.
Go into the text replacement settings on your device. On iOS, that’s General > Keyboards > Text replacement. On Android, it’s settings > system > keyboard > personal dictionary and add symbols/shortcuts. Add a new shortcut. In the field for the shortcut phrase, paste the mystery character. Then give it a shortcut name that’s easy to type but that you’re not going to say accidentally. I used “/col”.
Now, go to the chat and type your shortcut in. you might need to insert a space after the shortcut to get it to autocorrect, in which case delete the space after the color menu HOPEFULLY pops up.
Repeat this process for other types of formatting.
Italics:
Bold:
Underline:
Strikethrough:
Monospaced (like the ``` on discord):
Character to end whatever formatting you had within the line:
On Android, when you are typing in your shortcut, you may need to select the character from the center of your suggestions keyboard, like so:
How to control your channel
If you’ve created your own channel, you may want to have a heightened level of power over it. The first thing that you will need to do is register your nickname and channel with the server, so that nobody else can claim ownership of them.
Remember how, when you first connected to the server, there was a section called “Authentication” at the bottom? In the initial setup we left it as “No authentication,” but in order to gain powers over channels, we are going to need to use it. As it stands now, anyone can change their nickname at any time just by typing “/nick newname”. This means that just having a certain name doesn’t guarantee anything about who you actually are, and theoretically people could maliciously steal each others nicknames and impersonate each other. This isn’t really a major concern in a network like ours, so I didn’t include anything about it in the initial setup. However, if someone is going to have powers over a channel like setting a password on it, the server needs to know that the person using a nick is actually the rightful “owner” of it. That’s where SASL authentication comes in.
(Note: if you’re thinking “but I already have a registered account, that was the first step!” The answer is that that account is your account on the client, the software that lets you connect to IRC servers in the first place. It doesn’t have anything to do with any particular server knowing who you are. This possible confusion is why I didn’t want to bother with SASL authentication in the initial instructions. Sorry!)
Here’s the tradeoff: once you have registered your nick with the server, you can no longer change it. You will have to go by your registered name. If you’re OK with that:
-
Make sure you are currently using the nick you wish to register. In the text box in the green “Penthouse” channel at the top, which is called the lobby, enter: “/msg NickServ REGISTER yourpassword youremail@domain.com” with your desired password and your email address. (You can actually type this in any channel, as with any IRC commands, and they don’t show up to other users, but if you make a typo then it might not be recognized as a command and be sent as a message instead, so better to do it in the lobby where it won’t send as a message no matter what.)
-
Now you’re registered with the server, and you need to tell the client to pass those credentials to the server every time you connect. Choose “Edit this network” for the Penthouse server (right-click on the green text on desktop, or tap the three dots in the right hand corner of the lobby channel on mobile) and in the Authentication section, change your selection from “No Authentication” to “Username + password (SASL PLAIN)”. But in the nick and password you just registered, and save. Make sure you do this on all devices you usually use.
-
That should automatically connect you with your account every time, but if you ever get a message that says “this nick is already in use,” it just means the server doesn’t know it’s you trying to use it, and you can log back in by sending “/msg NickServ IDENTIFY yourpassword”.
-
Then, you can register your channel: “/msg ChanServ register #channelname”.
Now you can set various modes on your channel. Two that may interest you are:
-
Remove your channel from the channel list: send “/mode #channelname +s”
-
Put a password on your channel: send “/mode #channelname +k yourpassword”
-
For more to do with your nickserv/SASL account, see here.
Nerd Locker Stuff
Q: What is this?
A: An IRC server using the ergo software, accessed via the thelounge client. Both are hosted on a VPS running Debian.
Q: Can I use other IRC clients to access the server?
A: Sure! You’ll need the general server password, which can be obtained from tei, or if you already have a login to the thelounge client, by right-clicking on the penthouse server tab, editing the network, and showing the password in the Network Settings field.
Q: Can I use this client to access other IRC servers?
A: Sure! You can add whatever you want with the + in the lower left corner. Because the client records are still hosted on my server, the same terms, conditions and privacy policy as above applies to your use of other servers on the client.